Showing posts with label blog. Show all posts

Sunday, 22 July 2012

Facebook Pop out floating Like Box with smooth Jquery Hover Effect

With the advent of Jquery, the level of interaction by webpage using events has been tremendously increased and web pages had become very pleasing to read. Thanks to the Jquery Events.

With the use of Jquery Event, I had developed Facebook pop out like box with smooth Jquery Hover Effect.
The facebook like box will opt out when an user just hover on floating floating Facebook icon. It will look like the following picture. 

facebook-pop-out-floating-sidebar-widget-blogger  

Add Facebook like Widget on Blogger

 Just follow the steps:
1. Log in to your Blogger Dashboard, go to Design >> Edit HTML
2. Check the “Expand Widget Templates” box
3. Search (CTRL + F) for this tag:

 </head>

4. Add the following code just before/above </head> tag:

 <script src=”https://ajax.googleapis.com/ajax/libs/jquery/1.7.1/jquery.min.js”></script>

Important Note : If you have previous versions of jquery already in your HTML code, The widget will not work. 

So to avoid this, Search (CTRL + F) for “jquery.min”, you can find already installed jquery versions like the following

<script src=’https://ajax.googleapis.com/ajax/libs/jquery/1.6.1/jquery.min.js’/>

<script src=’https://ajax.googleapis.com/ajax/libs/jquery/1.5.1/jquery.min.js’/>

<script src=’https://ajax.googleapis.com/ajax/libs/jquery/1.4.1/jquery.min.js’/>

These all are previous versions that you can find, If you find any of these blindly remove the code or comment it.


5. Save the Template.
6. Now go to Design >> Page Elements >> Add a new Gadget >> Choose HTML/JavaScript and in the HTML box, paste the code below:


<div id="fbplikebox" style="display: none;">

<div class="fbplbadge"></div>

<iframe width="320" height="240" style="border: none; overflow: hidden; width: 250px; height: 250px; background: #FFFFFF;" src="http://www.facebook.com/plugins/likebox.php?href=https%3A%2F%2Fwww.facebook.com%2Flivepositiveway&width=250&height=250&colorscheme=light&show_faces=true&border_color=%23C4C4C4&stream=false&header=false" scrolling="no" frameborder="0" allowtransparency="true"></iframe>

<a style="font-family: arial, sans-serif; font-size: 9px; color: #999;" title="get this facebook pop out flaoting like box" href="http://www.theprogrammersguide.com/facebook-pop-out-floating-like-box-jquery-hover-effect" target="_blank">

Get this Facebook Widget for Blogger</a>

</div>

7. You should replace your Facebook Fan Page URL 

The above code will get my facebook fan page, You have to replace it with your page.

So Find the following in the above code

https%3A%2F%2Fwww.facebook.com%2Flivepositiveway

and Replace it with your facebook fan page username. You are now done.

Enjoy your Blog with Facebook like pop up box.!
If you have any problems in this Do let me know!!
Please leave your valuable comments for me to improve more.... :))))))))


Read More...

Add Social Sharing Buttons Below Every Post Title In Blogger

This post tells you about  How To Add Social Sharing Buttons Below Every Post Title In Blogger?? 

Social Bookmarking and sharing buttons helps your blog visitors to easily bookmark or Share your blog content with popular social websites. In this post we are going to show you how to add Social Sharing Buttons Below Every Post Title In Blogger.


  • Go to Blogger Dashboard --> Template --> Edit HTML --> Proceed
  • Backup your Template before making any changes to your blog
  • Now Expand Widget Templates
  • Press Ctrl + F and search the code shown below
  • Now Find the code shown below using [ctrl+F] 

       <data:post.body/>

  • Now Paste the Code Shown Below just above/before it

       <span class='st_facebook_hcount' displayText='Facebook'></span>
       <span class='st_googleplus_hcount' displayText='Google +'></span>
       <span class='st_twitter_hcount' displayText='Tweet'></span>
       <span class='st_sharethis_hcount' displayText='ShareThis'></span>

  • Now Find the code shown below using [ctrl+F]

    </head>

  • Now Paste the Code Shown Below just above/before it

       <script type="text/javascript" src="http://w.sharethis.com/button/buttons.js"></script>

       <script type="text/javascript">stLight.options({publisher: "074821ed-063e-4ae5-bad9-3e26ecf249f3"}); </script>


  • Now save your template
This how you customize your blogger. If you have any problems in customising please do let me know ..!!
If you like it share it with your friends.!! 
Read More...

How to show post summaries with thumbnail on homepage for blogger

Automatic showing post summaries with thumbnail for blogger used in blogger posts and all this work is done by the script automatically, you just don't need to locate your image the script will do all work for you automatically. Just you have to write your post and publish it with one image in post related to post.


Lets start with its installation


Now Login to Blogger Go to Layout > Edit HTML in your Blogger dashboard and check the "expand widget templates" box.

Find the closing </head> tag in your blog template, and paste the following section of code immediately before it:


<script type='text/javascript'>var thumbnail_mode = "no-float" ;
summary_noimg = 430;
summary_img = 340;
img_thumb_height = 100;
img_thumb_width = 120;
</script>
<script type='text/javascript'>
//<![CDATA[
function removeHtmlTag(strx,chop){
if(strx.indexOf("<")!=-1)
{
var s = strx.split("<");
for(var i=0;i<s.length;i++){
if(s[i].indexOf(">")!=-1){
s[i] = s[i].substring(s[i].indexOf(">")+1,s[i].length);
}
}
strx = s.join("");
}
chop = (chop < strx.length-1) ? chop : strx.length-2;
while(strx.charAt(chop-1)!=' ' && strx.indexOf(' ',chop)!=-1) chop++;
strx = strx.substring(0,chop-1);
return strx+'...';
}

function createSummaryAndThumb(pID){
var div = document.getElementById(pID);
var imgtag = "";
var img = div.getElementsByTagName("img");
var summ = summary_noimg;
if(img.length>=1) {
imgtag = '<span style="float:left; padding:0px 10px 5px 0px;"><img src="'+img[0].src+'" width="'+img_thumb_width+'px" height="'+img_thumb_height+'px"/></span>';
summ = summary_img;
}

var summary = imgtag + '<div>' + removeHtmlTag(div.innerHTML,summ) + '</div>';

div.innerHTML = summary;
}

//]]>
</script>
Note in above codes we can change the numeric numbers according to our need

summary_noimg = 430; is post cut height without image
summary_img = 340; is post cut height with image
img_thumb_height = 100; is thumbnail image height
img_thumb_width = 120; is thumbnail image width

Now find this code <data:post.body/> in your template and replace it with below codes.


<b:if cond='data:blog.pageType == &quot;static_page&quot;'><br/>
<data:post.body/>
<b:else/>

<b:if cond='data:blog.pageType != "item"'>

<div expr:id='"summary" + data:post.id'><data:post.body/></div>
<script type='text/javascript'>createSummaryAndThumb("summary<data:post.id/>");
</script> <span class='rmlink' style='float:right;padding-top:20px;'><a expr:href='data:post.url'> Read More...</a></span>

</b:if>
<b:if cond='data:blog.pageType == "item"'><data:post.body/></b:if>
</b:if>
Preview Your template if its showing thumbnail with "Read More", Save it.
Read More...

Saturday, 21 July 2012

Top 5 money making sites

How would you like to make money from what you already do online? We've compiled a list of over 100 sites where you can earn revenue from any content that you create.

Most of the sites on this list are based on sharing revenue from Google Adsense. If you have any concerns about a particular site then we would recommend not including your Adsense information on those sites.
We haven't tried all of these sites out, so if you know of any problems with payments not being made, then please leave a comment below and we'll update the list.

Also, if you know of any other sites that you think should be included on the list then please leave your suggestions in the comments section below.
Don't forget to sign-up for the Social Media Trader RSS feed before you go making all that money...
 

1. launchtags.com

Build a mini-page about your expertise, interests and know-how. Use text, pictures, video, links and blog feeds. Earn revenue brought in by your mini-pages

2. digitaljournal.com

Sign up today and join one of the most active news sites on the Internet! Share your thoughts, vote on newsworthy articles, engage in debates and even get paid to report news as a citizen journalist.

3. senserely.com

Our mission at Senserely.com is to provide a place for honest Google AdSense publishers to legitimately increase their daily earnings. As soon as you register, this basically becomes your website, with your AdSense blocks displayed next to your content, and you'll be able to write articles, reviews, and stories about your knowledge and experience with AdSense or any topic you feel confortable with, as well as read, ask questions, and exchange information with other AdSense publishers.

4. mytripledub.com

MyTripleDub is all about sharing. You post, we share. For every post you create, you get the benefit of 70% of the ads displaying using your AdSense account. If you send people here using your referral link, and they sign up, you get an additional 10% on any of the posts they make, and they still get 70%!

5. soulcast.com

Still using MySpace, LiveJournal or Xanga? If you're going to blog, why not get paid? When you sign up, you can make money through ads on your blog that generate revenue every time a reader clicks on an ad. It's free and easy!

Read More...

Sunday, 17 June 2012

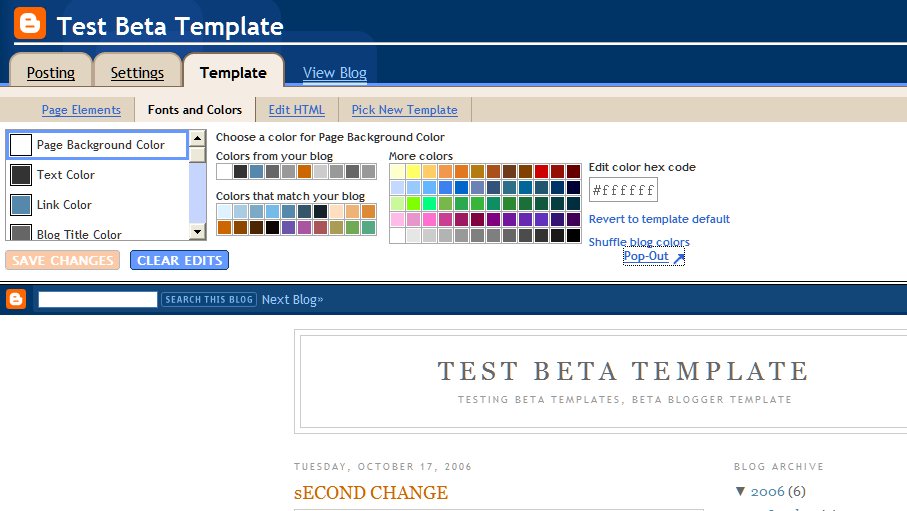
Customizing your blog

Customizing your blog is done through..............

the Fonts and Colors subtab under the Template tab. The code reponsible for customizing your blog resides in the third part of the template as shown in Parts of the Template. This is what the code looks like this :

/* Variable definitions
====================
<Variable name="bgcolor" description="Page Background Color"
type="color" default="#fff" value="#ffffff">
<Variable name="textcolor" description="Text Color"
type="color" default="#333" value="#333333">
<Variable name="linkcolor" description="Link Color"
type="color" default="#58a" value="#5588aa">
<Variable name="pagetitlecolor" description="Blog Title Color"
type="color" default="#666" value="#666666">
<Variable name="descriptioncolor" description="Blog Description Color"
type="color" default="#999" value="#999999">
<Variable name="titlecolor" description="Post Title Color"
type="color" default="#c60" value="#cc6600">
<Variable name="bordercolor" description="Border Color"
type="color" default="#ccc" value="#cccccc">
<Variable name="sidebarcolor" description="Sidebar Title Color"
type="color" default="#999" value="#999999">
<Variable name="sidebartextcolor" description="Sidebar Text Color"
type="color" default="#666" value="#666666">
<Variable name="visitedlinkcolor" description="Visited Link Color"
type="color" default="#999" value="#999999">
<Variable name="bodyfont" description="Text Font"
type="font" default="normal normal 100% Georgia, Serif" value="normal normal 100% Georgia, Serif">
<Variable name="headerfont" description="Sidebar Title Font"
type="font"
default="normal normal 78% 'Trebuchet MS',Trebuchet,Arial,Verdana,Sans-serif" value="normal normal 78% 'Trebuchet MS',Trebuchet,Arial,Verdana,Sans-serif">
<Variable name="pagetitlefont" description="Blog Title Font"
type="font"
default="normal normal 200% Georgia, Serif" value="normal normal 200% Georgia, Serif">
<Variable name="descriptionfont" description="Blog Description Font"
type="font"
default="normal normal 78% 'Trebuchet MS', Trebuchet, Arial, Verdana, Sans-serif" value="normal normal 78% 'Trebuchet MS', Trebuchet, Arial, Verdana, Sans-serif">
<Variable name="postfooterfont" description="Post Footer Font"
type="font"
default="normal normal 78% 'Trebuchet MS', Trebuchet, Arial, Verdana, Sans-serif" value="normal normal 78% 'Trebuchet MS', Trebuchet, Arial, Verdana, Sans-serif">
*/


This code is responsible for creating the Fonts and Colors customizing page of the blog under Template tab :


Examining the code carefully we see that each variable is named (Variable name="bgcolor") and its quality is described (description="Page Background Color") and given a default value (type="color" default="#fff" value="#ffffff").

This variable is passed here from the fourth or CSS part of the template. In this case it is here below in the second line prefaced by '$':

body {
background:$bgcolor;
margin:0;
color:$textcolor;
font:x-small Georgia Serif;
font-size/* */:/**/small;
font-size: /**/small;
text-align: center;
}

In order to create still more customizations in the template so as to give the user a WYSIWYG or graphical interface to customize his template we have to follow three simple steps :

1. Create a variable in that part of CSS describing your site ($bgcolor).
2. Describe its behaviour in the 'Variable definitions' part of the template.
3. Save Template.


Read More...

Tuesday, 12 June 2012

Disable Right Click In Blogspot


How To Disable Right Click In Blogspot


STEP 1 : Go to Blogger Dashboard -> Design  -> Page Elements.

STEP 2 : Click on Add a Gadget where you wish to place Search Box.

STEP 3 : Choose HTML/JavaScript from the List. 


STEP 4 : Choose your Disabler Type , Paste The Code in  HTML/JavaScript Save it. 

<script language=JavaScript> var message="Function Disabled!"; function clickIE4(){ if (event.button==2){ alert(message); return false; } } function clickNS4(e){ if (document.layers||document.getElementById&&!document.all){ if (e.which==2||e.which==3){ alert(message); return false; } } } if (document.layers){ document.captureEvents(Event.MOUSEDOWN); document.onmousedown=clickNS4; } else if (document.all&&!document.getElementById){ document.onmousedown=clickIE4; } document.oncontextmenu=new Function("alert(message);return false") </script>

Message Alert Script: 
Read More...